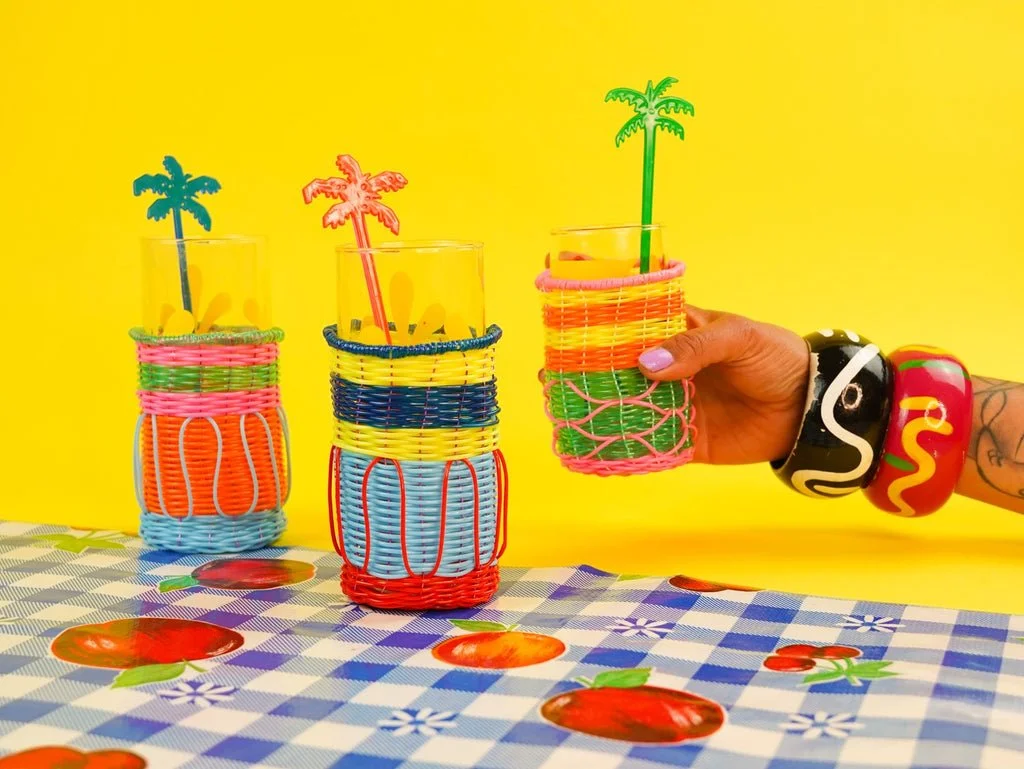
DIY Gifting: Woven Cup Holders
Welcome to my DIY Gifting series! These projects are designed with gifting in mind! In my opinion there's nothing more special and thoughtful than a handcrafted present. Creating with someone else in mind is really rewarding and meaningful too. So why not embrace craft and DIY and give the gift of handmade for your next birthday or holiday occasion? This year I’m all about the handmade gifts. I’m determined to make every present myself, even down to the wrapping!


In this project we’re going to create a woven cup holder using colourful plastic cord. These cup holders also work well as beer cozys, or as we call them in Australia - stubby holders. (and in the US, koozies I believe?). You might recognise this type of cord from projects in vintage craft books - it was huge in the 70s and 80s for weaving bags and accessories. When I travelled to Mexico in 2018 (best holiday ever) I saw it used many times in a myriad of inspiring ways, mostly for serving ware, baskets and bags. So beautiful!
The great thing about these cup holders is that once you’ve mastered the technique, you can create your own weave patterns, and make sets of them to give as gifts! Being made from plastic cord means that you can wipe them down after spills too, but these could also be made using raffia, macramé cord or yarn if you wanted.
I’ve partnered with Arbee for this project - a family owned and run craft supply supplier based here in Melbourne where I live. They’ve been around since 1902...imagine how many amazing craft supplies have passed through their doors since then!? While browsing their site I came across this cord in so many beautiful colours so I just knew I had to design a project around it for my DIY Gifting Series.
Also, and I’m excited to share this - you need go no further to source your supplies for this project (or any of your other DIY gifting projects for that matter) because for a limited time, Arbee is generously offering Australian makers 20% off their entire craft supply range by using the code KITCRAFT20 at checkout.* Head on over to their website and stock your cart with everything you need to make all your gifts this holiday season. Score!
Now, let’s get crafting. Watch the making-of video below, and follow along with the instructions to create these vibrant and summery cup holders:
You Will Need
Plastic cord/tubing in various colours
Wire cutters
Empty beer can

Time to craft!

Step 1

Cut 8 strips of wire, each 35cm in length and group in 2 bunches of 4, which you’ll then place into a cross formation. For easier weaving you might choose to use a dab of hot glue to secure the cross in place.
Step 2
With your first cord colour still attached to the roll, place the end horizontally across the wire, leaving a small tail. Holding the tail in place over the top of the cross, weave the wire around the back/under the top arm of the cross. Next, weave over the left facing arm of the cross. Rotate the cross clockwise, then weave the wire under the next arm, then rotate again and weave over the next arm, all while keeping the tension tight by holding onto the tail. Continue with this under/over weaving pattern for 3 rounds.
Step 3
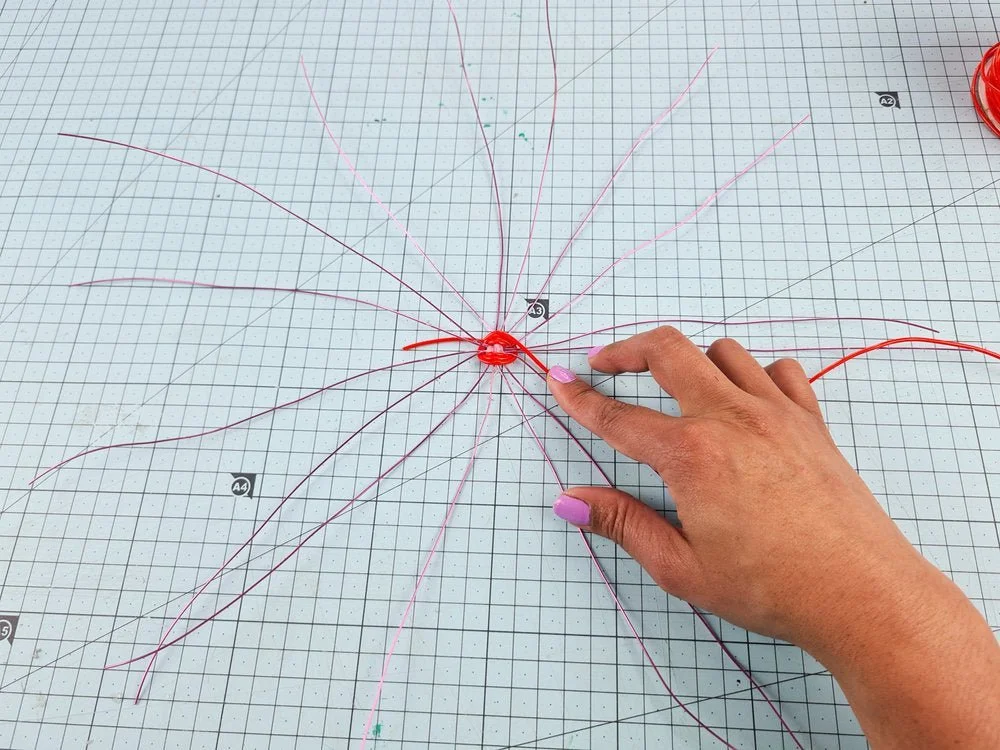
Hold the weave in place while you spread all the wires out evenly to form spokes. You might want to place it down on a table for better control over your weave. You need an odd number of wires to make this weave so snip one of the spokes off with wire cutters, readjusting the spokes evenly.
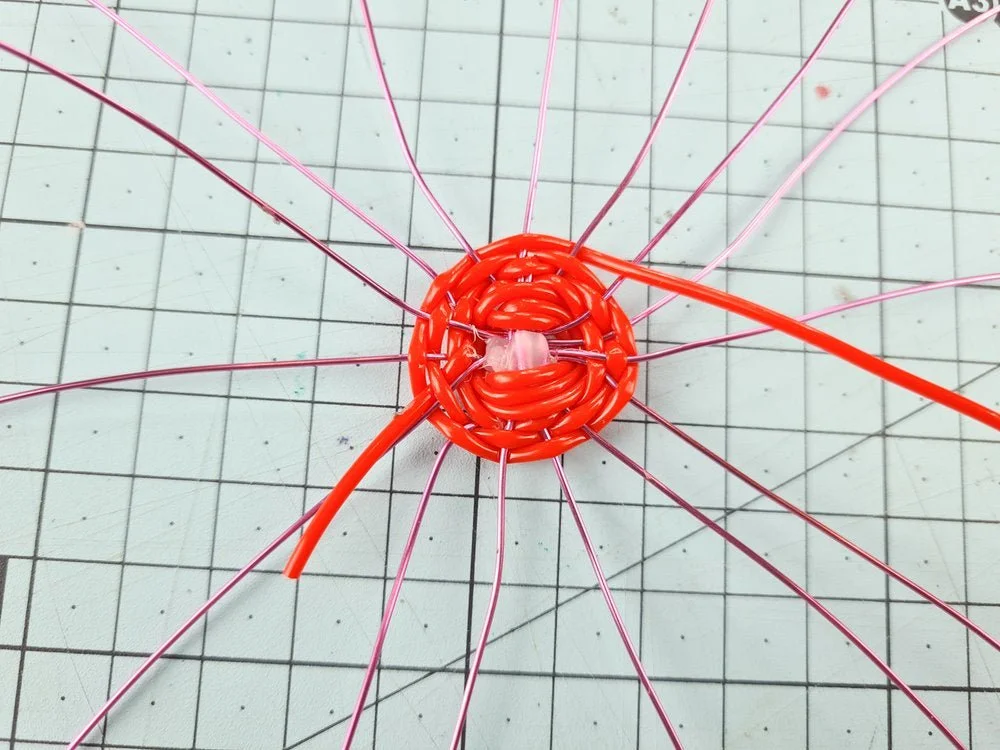
Step 4
Now it’s time to start the main weave. You basically want to weave under one spoke, then over the one next to it, then under the next, and so on, rotating as you go and keeping the tension tight.

Step 5
Once the weave starts to form nicely, I find it’s easier to work with it flat on a table. Continue weaving in this way until the base is large enough to fit your cup or can.
Once this is done, bend the wires up so you can start weaving the sides of your cup holder. Then just continue the weave as before, but moving up the sides.

Step 6
Here’s what to do if you want to change colours. For this project I left the first colour attached because I wanted to use it for some detail later so tucked it out of the way on the outside. To change colour, insert the next colour, leaving a tail, and continue the weave. You want make sure that as you go around, you weave the tail in as you go.
Once you’ve got your next colour started, insert the beer can so you can use it as a mold to shape the cup holder. Make sure you keep a good tension, but don’t pull too tight because I find the weave can tend to shrink as you go up, meaning it might be hard to insert and remove your cups or cans. Continue the weave, changing colours if needed to suit your chosen design.

Step 7
When you’ve finished weaving, trim the wires, leaving a 1.5cm tail on each, then fold them over the edge, tucking them back into the weave. To seal off your weave, loop a final cord colour tightly, all the way around the top edge. Weave its tail back through and trim off the excess to finish.

Step 8
I wanted to add some decorative detail to my cup holder so I went back to the original colour cord that I left attached, and created a looping design, held in place by lightly weaving across the surface of the cup holder.