
DIY Flower Appliqué Wallhanging
This vibrant appliqué wallhanging will brighten any room! Use your Cricut Maker 3 and rotary blade to make cutting all your pieces a total breeze!
This project was sponsored by Cricut. All designs and opinions are my own.
I love the idea of patchwork and quilting, but I’m a total beginner, so this was a great entry level project to learn some new piecing skills. If you want to try this for yourself you can find all the ready-to-cut files on my Cricut Design Space profile. If you don’t have a Cricut Maker 3, you can still create this project! There are some making notes at the bottom of this post just for you. Let’s get stuck in!


You will need
Cricut Maker 3
Cricut Rotary Blade
Cricut Fabric Mat
Fabric in assorted colours (use the guidelines below)
Fusible interfacing
Wadding
Sewing machine
Iron or Cricut Easy Press Mini
Scissors
Pins and sewing needle
Embroidery thread in matching colours to fabric
Dowel rod
Cricut Washable Fabric Pen (optional)
How to make an appliqué wallhanging
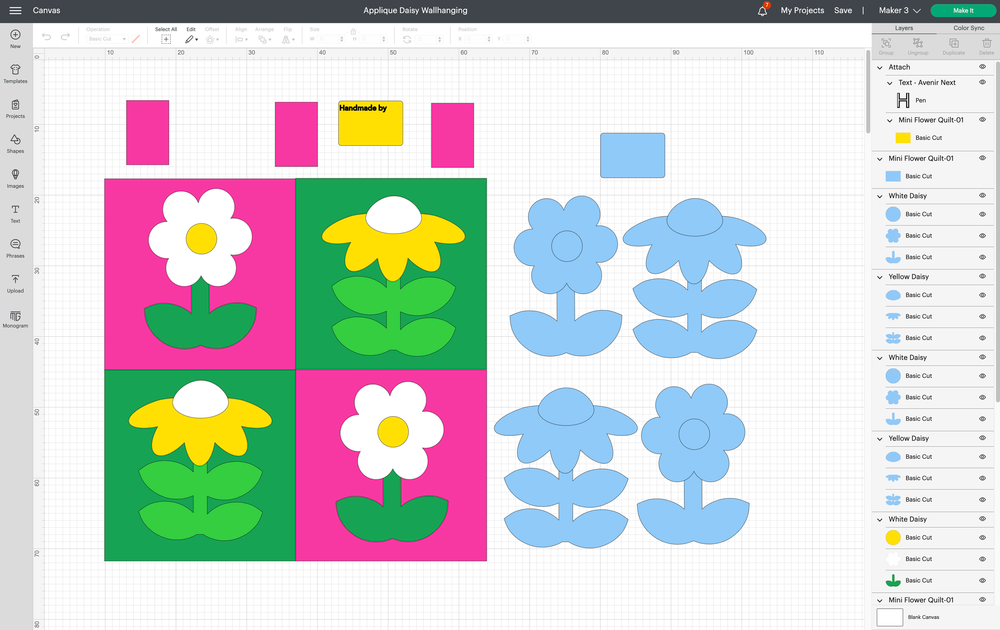
Prepare your fabric and fusible interfacing for the Cricut Fabric Mat, or for cutting by hand if you’re not using the Cricut. I used cotton drill and cut 30x30cm squares in the following quantities for cutting on the Cricut:
1 x white
1 x light green
1 x yellow
3 x dark green
3 x magenta
4 x fusible interfacing
If you’re cutting by hand, feel free to lay out your pattern pieces as you like for tracing and cutting.
Backing piece and wadding
You’ll need 1 large piece of magenta fabric (58cm x 58cm) for the back, and a piece of wadding at the same size. Both should match up to your sewn-together front pieces if you use 1cm seam allowance.

Step 1
Head to my Cricut Design Space profile to find the ready-to-cut project. Hit customise to open up the project. The main fabric pieces are colour coded, and the interfacing pieces are are blue for your reference.
Step 2
Make any tweaks you want to the project, like changing its colour, or adding your name to the nameplate template if you want to create one. If you are making a nameplate, you’ll also need a Cricut fabric pen to trace out the letters for you to embroider on afterwards.

Step 3
Load up your fabric mat with the first piece of fabric, then choose your fabric type in Design Space, and hit Make It to let your Cricut Maker 3 do the rest! After the fabric has been cut, make sure to change the material in Design Space to Fusible Interfacing so the rotary blade knows how much pressure to use to cut your interfacing sheets.

Step 4
If you’re using a Cricut Maker 3 for this project, the machine will cut all your fabric and interfacing pieces for you. If you’re cutting your pieces by hand, print out the PDF pattern, then cut out each of the templates. Transfer these onto your fabric and interfacing, following the instructions on each template piece. Then, cut everything out.
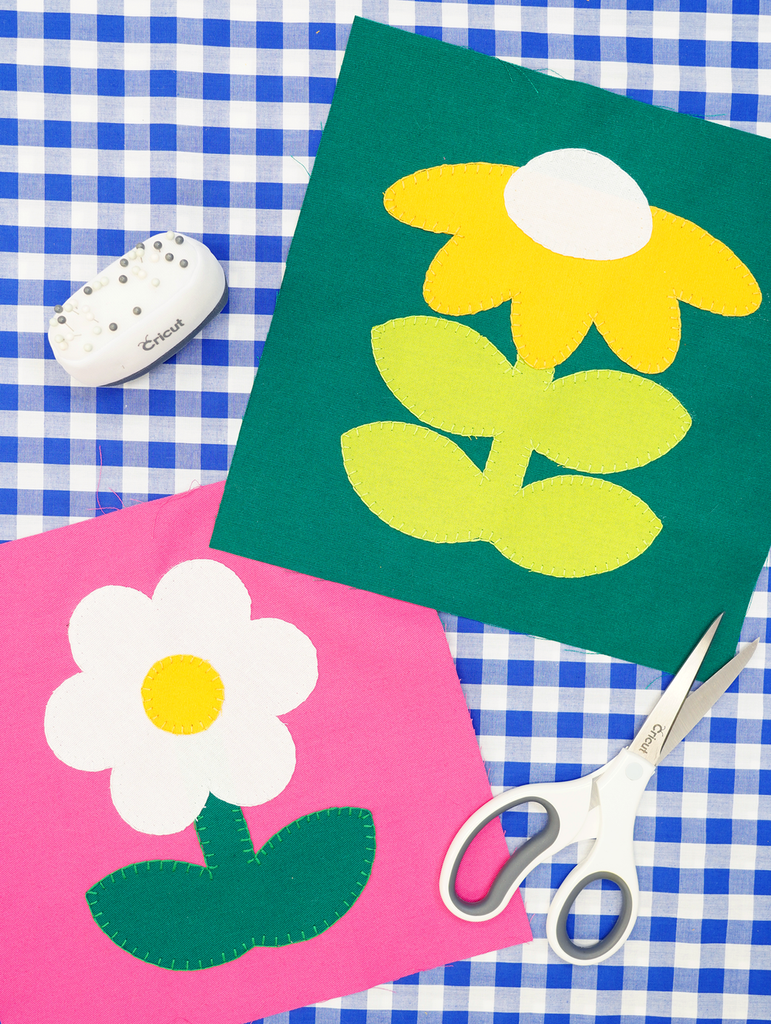
After all your pieces are cut, iron your fusible interfacing onto the back of each of your appliqué pieces. Then, assemble the flowers onto each of your square patchwork pieces and iron these on too.
Step 5
Use Blanket Stitch to applique your flowers onto the patchwork squares. You’ll find the instructions for Blanket Stitch here.

Step 7
Sew your squares together on a sewing machine to create your front wallhanging panel. I sewed the top two pieces together first, then the bottom two, then sewed these together, pressing the seams open on the back as I went. I used a 1cm seam allowance.


Step 8
Sew each of the 3 magenta hanging tab pieces together along their long edges only, then turn inside out. Press the hanging tabs so the seam is hidden at the back. These will form looped tabs to thread your dowel rod through.
Step 9
Cut your backing fabric and wadding to match the front panel (58cm x 58cm squares)
Step 10
Place the front and back pieces right sides together, with the wadding stacked over the back piece. Fold the tabs into loops with the seam on the inside of each loop. Pin the tabs between the front and back pieces, evenly across the top edge. Make sure that the looped ends are facing down inside your stacked fabric pieces. This is so that when you turn it right-side-out, the tabs will face outwards. Pin everything together to hold it in place, then sew your wallhanging together on all 4 edges with a 1cm seam allowance. Leave a 15cm section un-sewed so you can turn the wallhanging right-side-out. Press with an iron to finish.
Step 11
If you’d like to create a nameplate for the back, now’s the time to embroider your letters onto the yellow nameplate piece, using the letters drawn with the Cricut fabric pen (or traced from the template if cutting by hand) as a guide. I used a simple backstitch for my letters. After you’ve embroidered the lettering, iron and appliqué the nameplate onto the back of the wallhanging using blanket stitch.

Step 12
Thread a dowel rod through the loops for hanging.

I love how my new appliqué wallhanging looks in my studio! If you are keen to try this project I’d love to see what you create. Tag me on social media by using the hashtag #kitiyapalaskasdiy. Happy sewing!
Extra Making Notes
If you have a Cricut Design Space Access subscription you’ll be able to access my ready-to-cut project for this wallhanging from within Design Space at my profile here.