DIY Easy-sew Cushion Cover
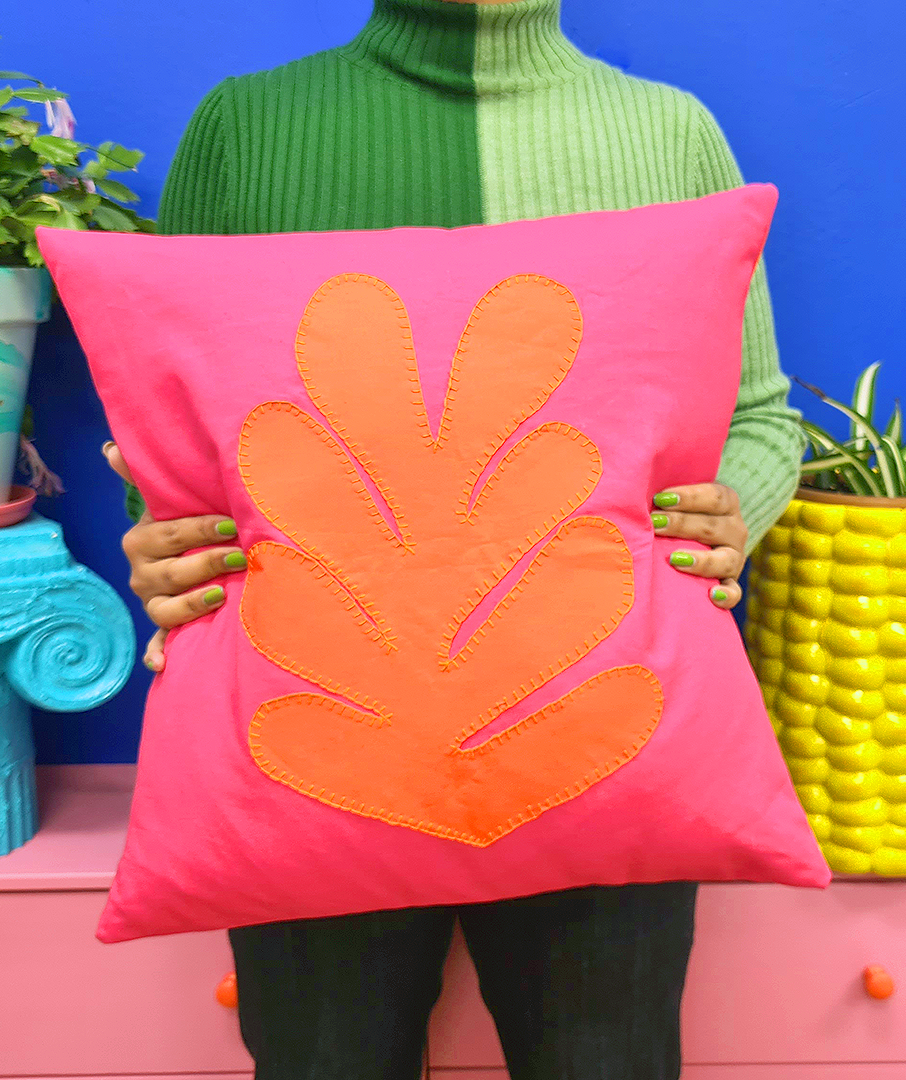
Here’s an easy-sew DIY project that you can complete in an afternoon! Are your cushion covers looking a little tired? Maybe it’s time to give them a makeover! Cushions are a fantastic way to add character and colour to a room, but purchasing them from a store can often be expensive. Also, the options out there can be kinda boring! This sewing project will solve that problem, and add instant tropical vibes to your living room decor.
I recently travelled to Magnetic Island (in Far North Queensland) for a week to do an artist residency. During my time there I was inspired by the many lush, tropical plants to create a series of paper collages. When I came back to wintery Melbourne after my trip, I wanted to bring some of those tropical vibes home with me. So I turned one of the paper collage motifs into a digital template and transformed it into an applique for this colourful cushion project. I’m planning on making a whole series for my couch, in all different colours! Read on to find out how to make one for yourself!
I recently travelled to Magnetic Island (in Far North Queensland) for a week to do an artist residency. During my time there I was inspired by the many lush, tropical plants to create a series of paper collages. When I came back to wintery Melbourne after my trip, I wanted to bring some of those tropical vibes home with me. So I turned one of the paper collage motifs into a digital template and transformed it into an applique for this colourful cushion project. I’m planning on making a whole series for my couch, in all different colours! Read on to find out how to make one for yourself!
 I was inspired by tropical plants to create these paper collages I was inspired by tropical plants to create these paper collages
|
 The paper motifs were transferred into digital templates to use in other projects The paper motifs were transferred into digital templates to use in other projects |
You will need
- Tropical Cushion Applique Template
- An old cushion that needs a new cover
- Fabric in 2 colours. I used Cotton Drill as it’s sturdy and durable. The amount of fabric you need will vary depending on the cushion you want to cover.
- Fusible interfacing for your applique
- Scissors
- Embroidery thread
- Sewing needle and pins
- Iron
- Ruler
- Tailor’s chalk
- Sewing machine. You’ll also need my tropical cushion template for the applique. You can find a link to download this in the caption below this video.
Time to sew!
Watch the video for a full walkthrough, then follow these simple steps to create your tropical cushion cover:
- The first thing to do is measure the old cushion or cushion cover and cut a square of fabric for the front panel of the cushion. I used magenta cotton drill for the front piece.
- Next, cut 2 panels for the back. I’m using orange and magenta for this. With the back, you want to cut the pieces in a way that the top piece overlaps the bottom by at least 10cm. This will create a handy sleeve that allows you to slip the cushion into the cover. Fold over the hems where the two pieces will meet and press them with the iron, then sew the hems.

- Download the template from the link in the video caption below and print it out. It’s currently sized to print on an A3 page but if you want you can scale it up or down at the time of printing to fit the cushion you’re covering. Cut out the template. Then, cut a piece of the fusible interfacing and a piece of fabric (in the contrasting colour to the front of the cushion) to fit the template. Iron the interfacing onto the back of the fabric. Then, transfer the template onto the interfacing and cut out your final leaf shape. After the piece has cooled from the iron, peel off the backing paper of the interfacing.
- Iron the leaf shape onto the front panel of the cushion, with interfacing side down.
- Now it’s time to add some applique detail to the leaf shape. I’m going to use Blanket Stitch (or a variation, Buttonhole Stitch) all the way around the edge of the leaf. Not only does this give a beautiful retro vibe to the design, but it also helps to secure the applique to the cushion cover and stop it from fraying. Push the needle from front to back through the fabric. As you come out the back, make sure your thread lies straight across the edge, on the back side of the needle, so that when you pull the needle through, the thread catches to form the stitch. Stitch all the way around the leaf.
- Pin the front and back panels together, right sides facing in and sew the cushion closed on your machine. Turn the cover right side out and insert your cushion to finish!

 |
 |


