
Dollhouse Makeover
I'm currently renovating a vintage dollhouse, to create my dream home - made mini! Follow along on my Instagram and TikTok for regular video updates on the makeover process, and read on below for my detailed making notes as each phase progresses!
This post was sponsored by WORX Australia and contains product links. All opinions and ideas are my own.

I’m currently saving to buy my first home. As I dream big about all the renovations and home decor projects in my near future, I thought I’d get some practice by renovating a dollhouse. I found this beautiful vintage dollhouse on Facebook Marketplace, after searching for ages for the perfect mini mansion to renovate. I bought it from an elderly couple that had originally renovated it for their (now adult) daughter. It’s so charming, and reminds me of a Dutch canal house!
In my craft-based design business I’m well known for my oversized props, but the obsession goes both ways! If you follow me on social media you’ll know that I’m also enamored with anything miniature. There’s just something about an every-day object made tiny (or giant!) that appeals to me so much, so the idea of creating a whole house full of handmade miniature furniture and decor was irresistible.


I’ve never renovated a dollhouse before and am excited about the opportunity to do something new. In this series I’ll share all of my experiments, thrills, and no doubt some spills along the way as I makeover my house bit by bit. To begin, I decided to tackle the facade of the house, as it seemed like a nice, easy, entry-level way to get started. I’ve partnered with WORX Australia for this post. They generously gifted me their MakerX series of power tools which, delightfully, are all mini-sized and therefore absolutely perfect for renovating a mini dollhouse! There was a bunch of things I needed to do on the facade that the tools were perfect for, which gave me a chance to test them out and have a play.
Materials notes
For the Facade phase of the dollhouse renovation I used the WORX MakerX series of hobbyist power tools. In particular I used the Angle Grinder, Rotary Tool, Hot Glue Gun, and Mini Blower.

In addition some other supplies I used were:
Interior wall paint in 2 colours
Old plastic filing sleeves (for the windows)
Pliers
Scissors
Cutting mat and knife
Paintbrushes
Paint markers
A wooden floral embellishment
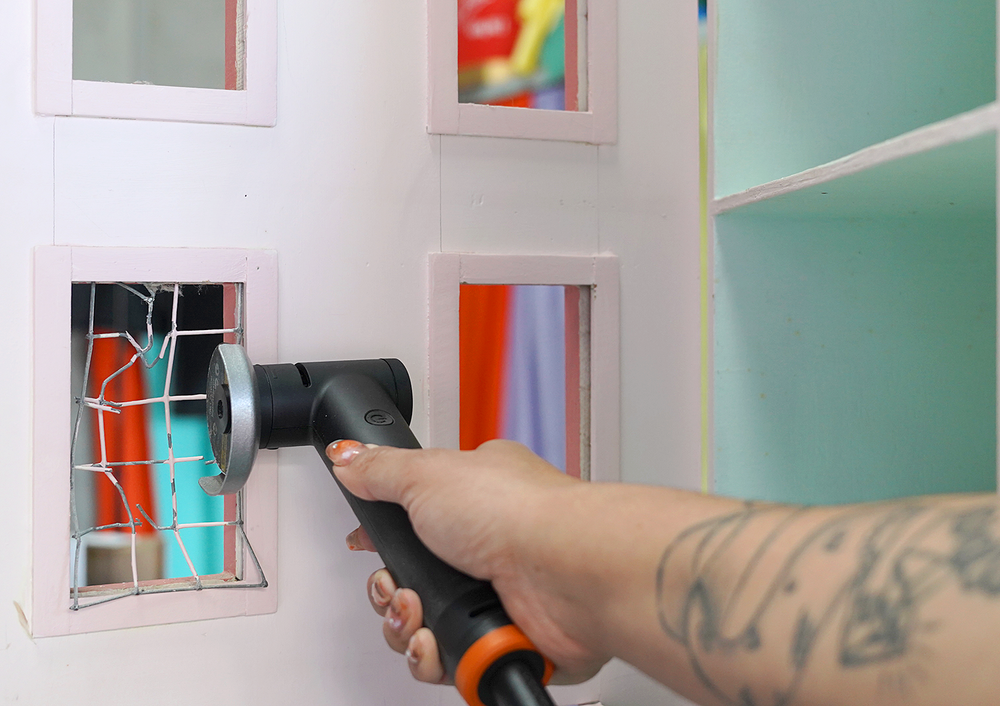
Using the MakerX Angle Grinder to remove the old window bars

Preparing the facade for painting
Making Notes
My dollhouse looks like it was originally handmade, and has been lovingly hand painted over the years. For this project I want make sure I celebrate the handmade vibe of the house, while also giving it a gentle makeover to match my personal style.
The house originally had wire bars on the windows, which I assume were meant to be window panes, but in my opinion were a little creepy. I wanted to remove these and keep the windows big and open so I used the MakerX Angle Grinder to cut through some of the wires on each set of bars, to make removing the bars from inside the window cavities easier and neater. I used pliers to pull the wires out.
The next step was to prepare the facade for a fresh coat of paint. There were a few lumps and bumps on the window frames from use over the years, and a few scratches in the existing paint. I used the MakerX Rotary Tool to sand back any bumps and prepare a smooth surface for the new paint. Most of the paint was fine to just paint over and was light enough to act as a solid base coat, so I didn’t sand back the entire facade, just the lumpy bits.


Time to paint! I used some wall paint that I already had lying around from my new studio reno, three vibrant colours that match my brand colours. This electric blue is one of my favourite colours ever, and I thought it would be perfect for making the dollhouse pop. It reminds me of many houses I saw on my travels in Mexico, where every house is painted a vibrant colour, a lot of the time in this shade of blue. I chose a contrasting lavender shade for the window and door frames, and a vibrant glossy orange for the roof and door.


To create the new window panes for my dollhouse I used some old clear plastic folders that I had in my office supply cupboard. You could also use thin sheets of clear acrylic but for this project I want to use as many existing supplies and upcycle as much as possible. The window cavities already had grooves in them where the wire used to be, so all I had to do was cut each pane to size, and slot them in, which was easy to do with the flexible plastic.


Lastly I wanted to add a decorative element to the front of the house, to compliment its decorative shape. I found a collection of wooden floral embellishments at a craft supply warehouse sale recently, and thought one of these would be perfect to use. After painting it with paint markers, I used the MakerX Hot Glue Gun to affix it to the front of the house.


What do you think of the upgraded facade? I love how a lick of paint and a few simple changes have transformed the vibe of the house and made it feel more playful and more my style. Choosing these colours has also helped me narrow down my ideas for what to do with the interior of the house. With so many options to choose from, I was feeling a bit overwhelmed, but now I can gain inspo from the facade when planning for the decor within. The next step? Put together some sketches and ideas for the interior, and pick a floor to get started on!
Be sure to keep checking back for more Dollhouse DIY. You’ll find more behind-the-scenes videos about this project on my TikTok and Instagram. Let me know what you think in the comments or send me a DM with any ideas for what I should do next!
A huge thank you to WORX Australia for sponsoring this post. Partnering with brands on my creative projects helps me live out my dreams as a full time craft-based designer, and I appreciate the support of my amazing clients so much